
Note. I have partially updated this post with new info and a video (Updated on 20th April)
For my RailAdventure module, I have 8 turnouts (16 LED) on Segment 2, 4 turnouts (8 LED) on Segment 4 and 7 turnouts (14 LED) on Segment 5! I want to build a separate control panel (dt. Gleisstellpult) to switch the 19 turnouts with respective LED.
Märklin has Märklin/Trix C-Track electric turnout mechanism (Art. no. 74491), cost between 20 Euro and 23 Euro retail (Märklin RRP 25,99 Euro). This excludes control box (Art. no. 72720) (Märklin RRP 23,99 Euro) which can handle up to 4 turnout mechanisms, and cable/connectors.
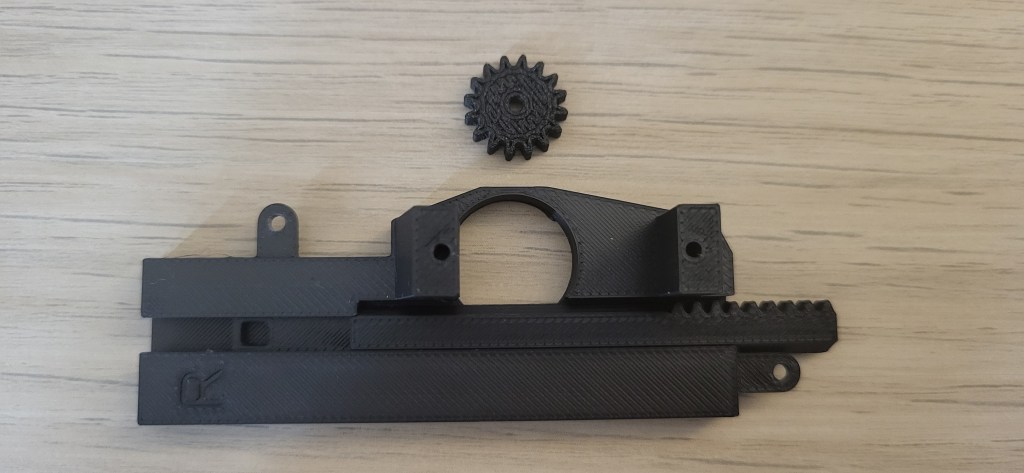
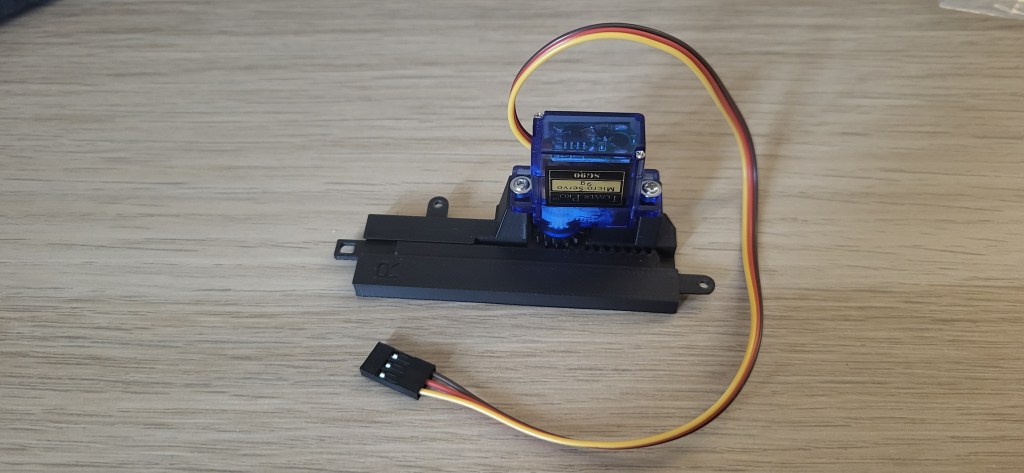
I was considering alternative solution using servos and Arduino sketch and a 3D printed mechanism. The 3D printed mechanism will well-built and I hope it can take the load and slidings.


Cost Consideration
From cost perspective, I did a quick tabulation below and could argue that it is economically cheaper to use servo and Arduino shields. My other reason for going the servo way is to use Arduino and later DCC-EX EX-CBS1 command station to power and manage the sketches for 19 turnouts and LED.
| PARts | Märklin | GeneriC |
|---|---|---|
| Mechanism (Märklin electric / Microservo) | 20.00-23.00 Euro (no extra holder needed) | 3.00-3.50 Euro (Type SG90) / 4.50-6.90 Euro (Type MG90S) + 4.90 Euro Holder |
| Controller (Märklin / Uno + PCA9685) | 18.00-22.00 Euro (Control Box) (4 mechanisms) | 11.00 Euro (PCA9685) (4 servos + 8 LEDs = 12 channels used) + 14.00 Euro (Elegoo Uno R3) |
| Cost per Turnout * (calculation based on 4 mechanisms) | 24.50 – 28.50 Euro | 14.15 – 14.65 Euro (SG90) 15.65 – 18.05 Euro (MG90S) |
* excludes delivery cost, no bulk purchase or small accessories such as cables, LEDs, screws, external power supply etc.
I made a simplified assumption in my above calculation namely Elegoo Uno is used to run the sketch for 4 turnouts and 8 LED. I can write an Arduino sketch to run many turnouts and LED (and other things) subject to the memory capacity of the Uno. In addition, with one extra PCA9658 16-channel PWM module (total 2 modules), it can support another 6 servos and 12 LEDs with 2 unused channels. As a result, the average cost per turnout for 10 servos is between 12.50 and 15.40 Euro!
Other Considerations
If you do not want to delve into Arduino programming or if you want to integrate into your Märklin mobile or central command station, then using Märklin electronic mechanism with or without turnout decoder make more sense. In addition, the wiring is simplified as it draw power from the track and the communication bus is within.
If you do not want to program the sketch yourself, then you can copy and tweak my single turnout sketch below (Note: this sketch does not include connection to PCA9685 module or to support more than one single turnout)
// Single Servo Märklin Turnout with 2 LED (straight/divergent) and a push button
// 3D printed turnout mechanism from Ebay-Seller ipv-europe
// Version 1.0 (Beta Test) created by Jimmy Low (germaN87AC.com) on 20th April 2025
// Version 1.1 (Beta Test) updated on 22th April 2025
#include <Bounce2.h>
#include <Servo.h>
// Turnout 1 configurations
const int buttonPin1 = 2;
const int straightLedPin1 = 12;
const int divergentLedPin1 = 13;
const int servoPin1 = 9; // Use only PWM pins on Uno/Mega
const int servoAngles1[] = {0, 97}; // Adjust and test the mechanism arm movements and matching values before attached to Märklin turnout
// States for Turnout 1
int straightLed1State = HIGH;
int divergentLed1State = LOW;
int servoState1 = 0; // 0 = Straight; 1 = Divergent
int servoPosition1 = servoAngles1[0];
int servoTarget1 = servoAngles1[0];
// Bounce button and servo
Bounce2::Button button1 = Bounce2::Button();
Servo switch1;
void setup() {
// LED setup
pinMode(straightLedPin1, OUTPUT); // Yellow LED
pinMode(divergentLedPin1, OUTPUT); // Red LED
digitalWrite(straightLedPin1, straightLed1State);
digitalWrite(divergentLedPin1, divergentLed1State);
// Button setup
button1.attach(buttonPin1, INPUT_PULLUP);
button1.interval(10);
button1.setPressedState(LOW);
// Servo setup
switch1.attach(servoPin1, 440, 2400); // Minimum and maximum pulse widths in microseconds.
switch1.write(servoPosition1); // This ensures that at reset the servo will return to Position 0 (straight).
}
void loop() {
button1.update();
if (button1.pressed()) {
straightLed1State = !straightLed1State;
divergentLed1State = !divergentLed1State;
digitalWrite(straightLedPin1, straightLed1State);
digitalWrite(divergentLedPin1, divergentLed1State);
servoState1 = !servoState1;
servoTarget1 = servoAngles1[servoState1];
moveServoSmoothly(switch1, servoPosition1, servoTarget1);
servoPosition1 = servoTarget1;
}
}
void moveServoSmoothly(Servo &servo, int from, int to) {
int step = (from < to) ? 1 : -1;
for (int pos = from; pos != to; pos += step) {
servo.write(pos);
delay(5); // Set movement speed in milliseconds: default 5ms: instantaneous 1ms; medium 5ms; slow 10ms
}
servo.write(to);
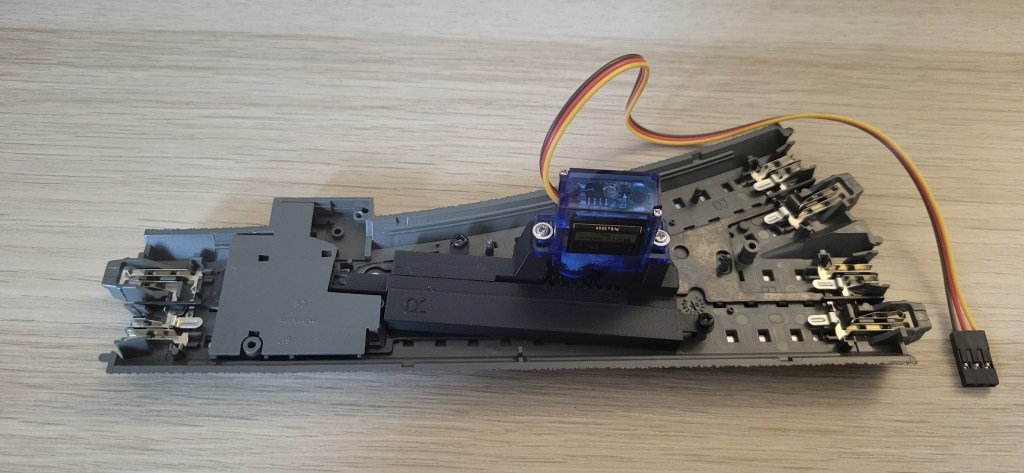
}Before fixed the turnout mechanism in place, I adjust the parameter const int servoAngles1[] = {0, 97}; to make sure that when on straight route, the round disc (Märklin part) is fully closed and the mechanism arm will lock the disc in its place when the servo is in position 0. Likewise, when the arm will be fully extended and lock the disc in place on divergent route (servo position 97). It may vary based on your servo and the mechanism. So, always TEST, TEST and TEST every servo before fixed in its place.

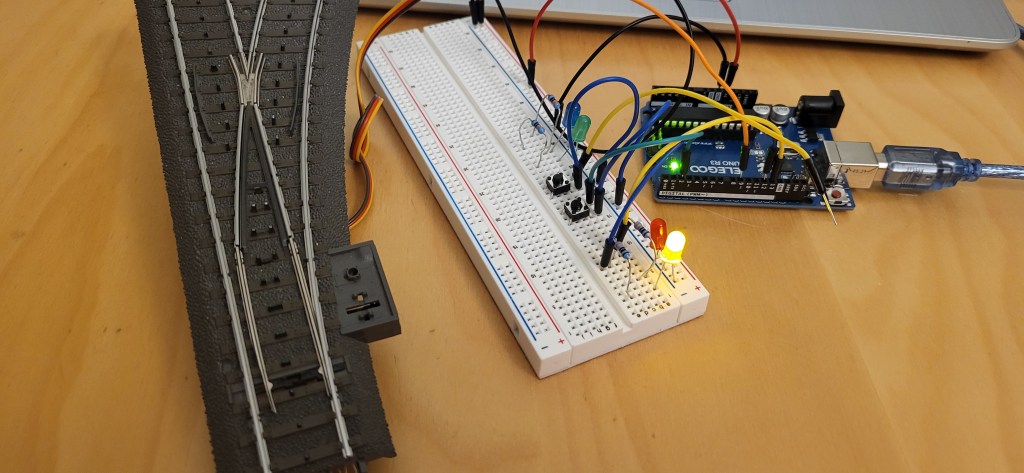
Video on this 3D printed mechanism and servo at work.
I am very happy with the results. The servo works smoothly and the LED indicator turns on correctly. Now, I need to replicate this 18 times !!
